
The fuel cell is a Summit 4 gallon (nominal) aluminum cell. It’s mounted on a BMR Accessories luggage rack. The hoses and fittings are mostly Aeroquip Socketless AN-6, with some Earl’s and Summit pieces and adapters, and Jiffy-Tite quick disconnects.
The cell sits on 1 ½ inch square steel stock to elevate the output ports above the lip on the rear of the rack, and also because the mounting holes for the cell coincide with the support members for the rack. So the cell is bolted to the 1 ½” steel stock, and the steel stock is bolted to the rack.
I chose to mount the beveled side of the cell forward so that it provides a bit more clearance for throwing my leg over the seat and not hitting my shin on the sharp corner of the cell.
The cell is gravity fed. When the main tank is down to a couple of gallons, I open the valve. The cell drains quickly at first, then slows down as the levels of the main tank and the cell even out and the cell’s head is less. It takes about 20 minutes for most of the fuel to drain from the cell into the main tank. As worst case fuel usage on the RT is about 2 gallons per hour, this should be plenty fast enough.
The rack attaches to the bike with four thumbscrews. There’s a quick disconnect on the fuel cell line underneath the right side panel (see below), so the cell can be removed easily to get access underneath the seat (i.e. to the fuse box). The rack bolts into the bike’s subframe, so the cell is electrically grounded through the rack without the need for a separate ground wire.
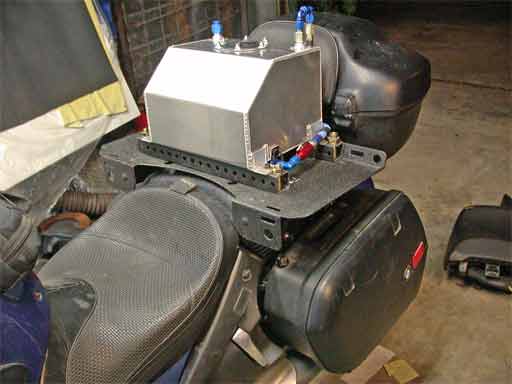
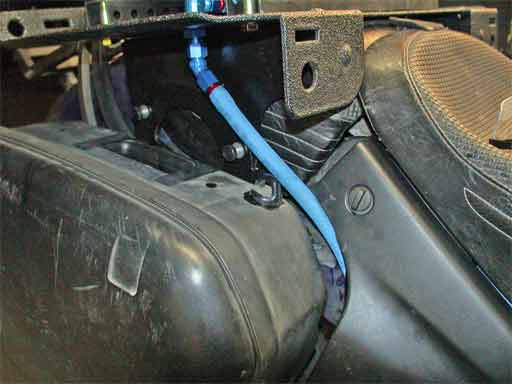
Overall view of the cell as installed.
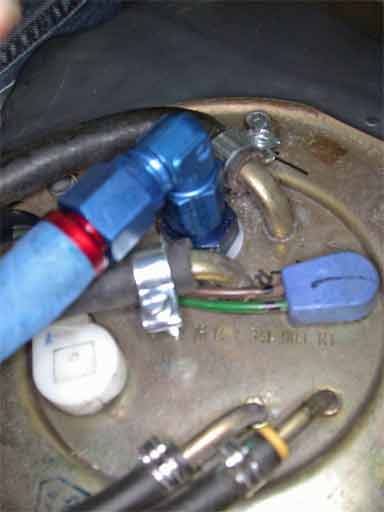
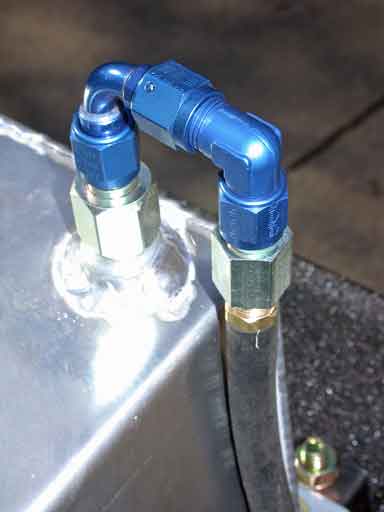
Closeup of the bulkhead fitting installed into the fuel pump plate. It’s a Jaz fuel cell bulkhead fitting that comes with plastic washers for the inside and outside. I initially tried a shorter Russell bulkhead fitting that had one washer (on the inside), but it leaked. There is barely enough room for the AN-6 fitting in between the hard hose fittings and all the stuff on the inside, and it’s a bear to tighten the nuts on the fitting.

Another view of the bulkhead fitting, the 90 degree fitting, and the hose end at the tank. I think the straight bulkhead fitting with the 90 degree connector fits better than a 90 degree bulkhead fitting would have.
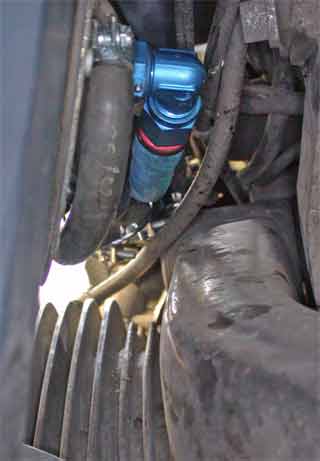
View inside the fairing from the front. The Telelever is on the right, the finned cylinder head on the bottom, the main tank on the left with one of the stock fuel lines visible. Not much room to work in there.
Back side of the cell, looking down. One supply fitting is capped. The fuel comes out through an AN-8 90 degree fitting, an AN-8 to AN-6 adapter, and into the supply hose. I used the right side fitting instead of the closer left side fitting because otherwise the hose bent too sharply and was too short to assemble with the Socketless assembly tool. The vent hose is visible on the left side in its original location (see below).
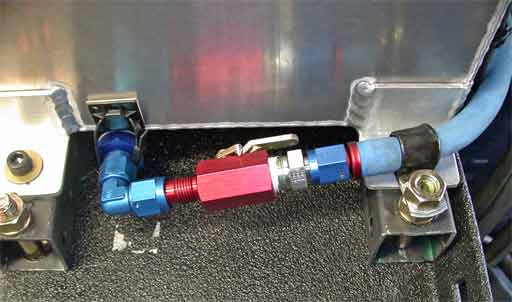
Left side of the cell. The hose comes around the corner, is held down by a hose clamp. Then it goes into an Earl’s shutoff valve. Then a 90 degree turn, under the cell, into an Earl’s fuel filter. The filter is held against the underside of the cell with a cable tie.

Closeup of the physical mounting and the fuel filter underneath the cell. If the fuel filter element needs to be cleaned out or replaced, the section of hose underneath the cell comes apart with a hose wrench. The shutoff valve is at one end of the removable section, and the fuel line disconnect is just beyond the other end, so it should be relatively easy to change the filter if necessary.
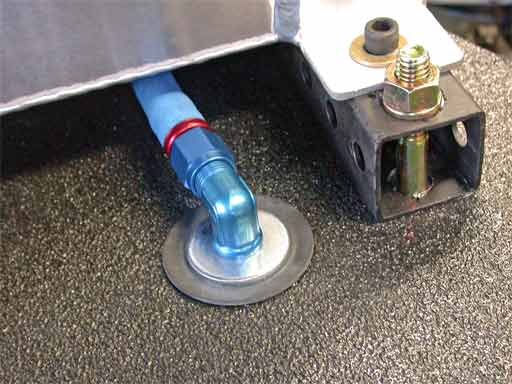
Supply line coming out from underneath the right side of the fuel cell and into a 90 degree bulkhead fitting that goes through the rack. This is so the fuel line doesn’t have to go all the way around the outer edge of the rack.
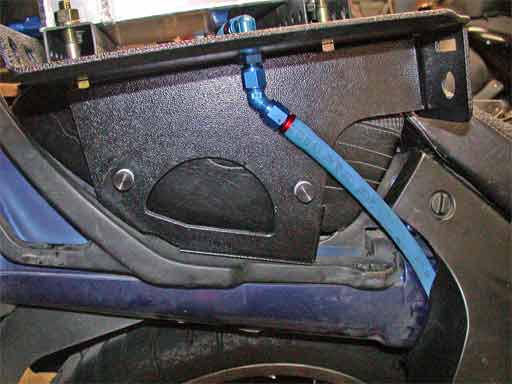
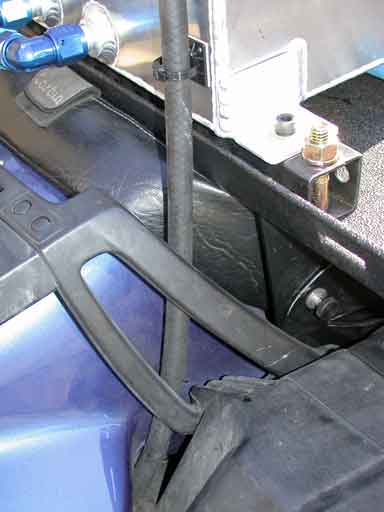
Side view of the right side. The line from the fuel filter goes through the bulkhead, through a 45 degree fitting, and underneath the black side panel. You can also see the thumbscrews that hold the rack onto the mounting brackets. Unscrew these and unplug the quick disconnect, and the rack and cell assembly lifts off.
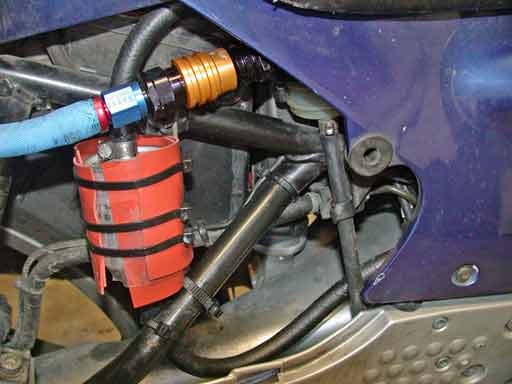
With the side panel removed, you can see the supply line from the cell going into a Jiffy-Tite quick disconnect before disappearing under the fairing panel and forward to the fuel pump plate and into the main tank. A bit of bad planning here; the line to the right of the disconnect should have been about ½” longer. As it is, one side of the quick disconnect is slightly underneath the fairing panel, so it’s not as easy as it could be to operate the quick disconnect.
Also you can see the external fuel filter for the main tank. Instructions for mounting the fuel filter outside the main tank are on the Internet BMW Riders website. The main fuel filter is zip-tied to a support bracket, so it can be removed easily if need be.
I carved a chunk out of the black side panel (a spare one I got at a a flea market for $8) to provide clearance for the line for the fuel cell. When everything is together, it’s neat and clean and the line from the fuel cell is well protected by the BMR rack.
I initially attached the vent line to the vent fitting with the rollover valve in it, but it turned out the cell wasn’t freely venting through the rollover valve and so wasn’t draining well, so I moved the vent over to the straight-through vent fitting over on the other corner. That cut the drain time from 40-60 minutes to 15-20 minutes.
The vent line is overkill. It could have been a 180 degree Socketless fitting jammed into some icemaker hose. As put together, it’s an AN-8 to AN-6 adapter, a curved 90 degree fitting, a right-angle 90 degree fitting, and an AN to pipe-thread adapter. The vent line is non-fuel-injection 5/16” hose that I ordered by mistake and couldn’t return. It runs down the back of the cell, under the luggage rack, under the taillight to the right side of the bike, through the wiring for the auxiliary rear lighting, and through a zip-tie loop that keeps it on the rearmost side of the rear fender, so it drains away from the rear tire.
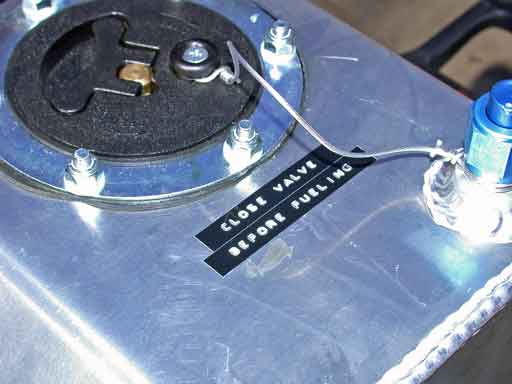
As a final touch, I made a tether out of plastic-coated picture-hanging wire to tether the filler cap to the cell. This should make it more difficult to lose the cap when I ride off after forgetting to replace it. Also a reminder to close the drain valve before filling the cell so I’m not trying to fill the main tank through the cell line. (I’m not sure what would happen, but ending up standing in a puddle of gasoline strikes me as one undesirable possibility).
N.B. The cell is called a 4 gallon cell, but its more like 3.5 gallons usable. There’s about 2/10 gallon that never drains because the fuel outlets are about one-half inch above the bottom of the cell, and the cap projects slightly into the tank so you can’t fill the cell to the brim without spilling some when you put the cap on. That makes the usable capacity of the bike around 10.6 gallons total (plus whatever is in the fuel lines, plus the little gain from moving the main fuel filter outside the tank). At a crappy mileage of 39 mpg, the range is just over 400 miles. Official capacity is 11.26 plus a bit, comfortably under the 11.5 gallon IBR limit.